Sir John Nibbles, a Porg of Distinction
Back to Kitbashes for Friends and Family.
Back to Kitbashes for Friends and Family.
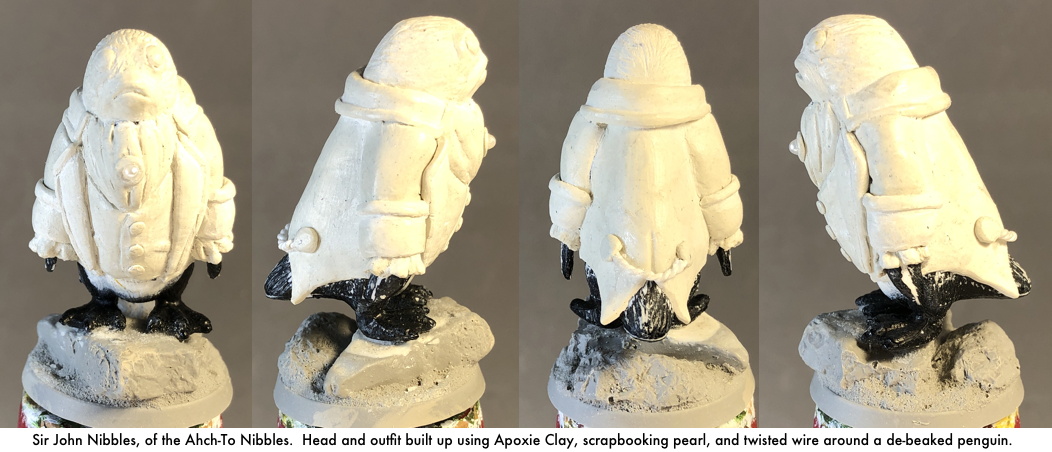 I started with a 4cm tall penguin figure I had in my parts bin. I don't remember where I got it, it
might have been part of a "Toob" set, or just loose in a quarter bin at the flea market. I cut off the
beak and used my Dremel to sand down the head to more of a post. Then I slowly built up details with
Apoxie Clay, a two-stage resin. I'd wait for a layer to harden before trying to add more, for instance
doing the cravat before the vest, and the vest before the lapels. There's two parts I didn't make from
Apoxie Clay: the gem in the cravat is a scrapbooking pearl, and the chain in back is a piece of wire
twisted into a chain shape. Click on the picture to the left to see the "almost ready to paint" stage
full size. ("Almost" because when looking up Porg pictures at this stage for the colors, I found that
they did have visible nostrils. I'd been using the Porgtrooper figure for reference, and it was too
small to have nostrils.)
I started with a 4cm tall penguin figure I had in my parts bin. I don't remember where I got it, it
might have been part of a "Toob" set, or just loose in a quarter bin at the flea market. I cut off the
beak and used my Dremel to sand down the head to more of a post. Then I slowly built up details with
Apoxie Clay, a two-stage resin. I'd wait for a layer to harden before trying to add more, for instance
doing the cravat before the vest, and the vest before the lapels. There's two parts I didn't make from
Apoxie Clay: the gem in the cravat is a scrapbooking pearl, and the chain in back is a piece of wire
twisted into a chain shape. Click on the picture to the left to see the "almost ready to paint" stage
full size. ("Almost" because when looking up Porg pictures at this stage for the colors, I found that
they did have visible nostrils. I'd been using the Porgtrooper figure for reference, and it was too
small to have nostrils.)
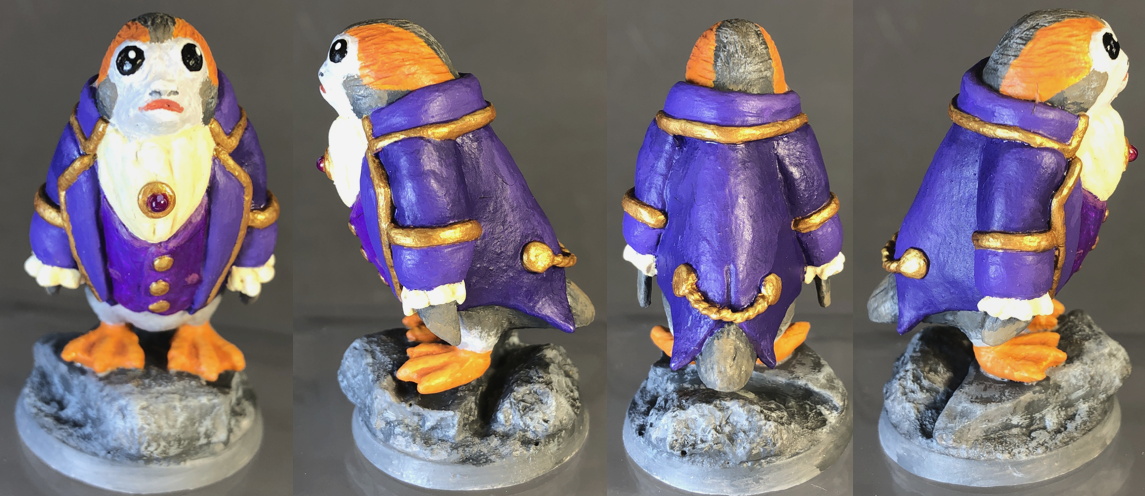
 The actual shaping of finer details was accomplished through a mix of techniques. Some parts looked
just fine after being soft-shaped and allowed to harden (used X-Acto blades and some clay carving tools
at this stage). But most of the surfaces needed at least a little work with files or blades. Larger
removals and smoothing required the Dremel again, and I used a cutting head to score the feathery pattern
into the head.
The actual shaping of finer details was accomplished through a mix of techniques. Some parts looked
just fine after being soft-shaped and allowed to harden (used X-Acto blades and some clay carving tools
at this stage). But most of the surfaces needed at least a little work with files or blades. Larger
removals and smoothing required the Dremel again, and I used a cutting head to score the feathery pattern
into the head.
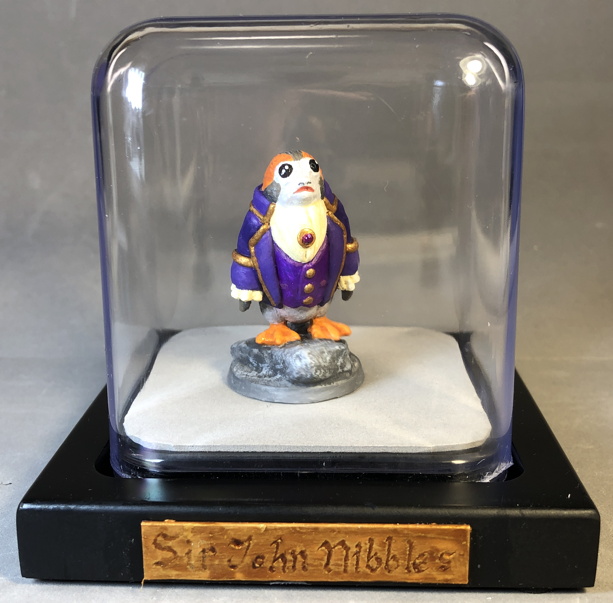
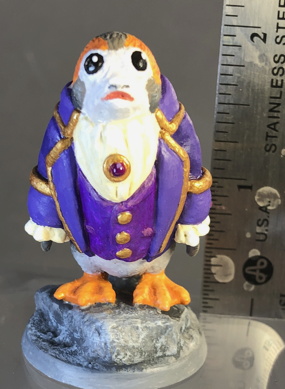
The base I used is a stone base from Models & Minis, with a little reshaping to make it easier to glue the figure to it. With base, the whole thing is about two inches (5cm) tall, somewhat bigger than most of the minis I paint, but smaller than a Monsterpocalypse monster. Most of the paints I used are "craft" paints, available in 2oz. bottles from places like Michael's, JoAnn Fabrics, or the craft aisle at Walmart. I sealed with Pledge Future for durability, and then re-sealed with Vallejo matte sealant to dull down the shiny. I left the eyes and brooch shiny, though.
All that remained was to find a way to display it so that the dust wouldn't be a problem. After looking around a bunch of places, I settled on a baseball display case from JoAnn. I cut a styrene slat and used my Dremel to carve calligraphy into it, then painted it a few shades of gold and sealed it with a mixture of Pledge Future and brown ink. I cut out a piece of adhesive-backed gray craft foam to put inside the plastic box, both for aesthetics and to reduce the chances of sliding around.